
AdVerse Forms Guide
AdVerse Forms is the complete form system: build registration forms, surveys, applications and order forms, share them with a link or on your website, collect answers and payments, and work with the results.
This guide tours the whole system in the order you will meet it: the home page and its menus, starting a form, the builder with all its question types, the four workspace tabs, every settings screen, sharing, what respondents see, responses, and managing your forms. Each chapter says what the screen is for, what you see, and how to do each task step by step. Screenshots use a made-up demo form, Greenfield Youth Camp Registration, so the questions and answers are examples only.
Words in bold are the exact labels you will see on screen.
Your first form
Do these in order. Each item links to the chapter that explains it.
- Start a form — blank, or from a ready-made template. Starting a new form
- Add your questions from the question list. Adding questions
- Mark the must-answer questions as required. Question settings
- Share it — send the link, put it on your website, or print the QR code. Sharing your form
- Read the answers and download them when you need them elsewhere. Reading responses
Opening Forms
- From the AdVerse menu, open AdVerse Forms. You land on the Workspace, the home page with all your forms.
- If the page cannot load, check your internet connection and select Retry.
1Finding your way around
The Workspace is the Forms home page: every form you made or were invited to, in one place.
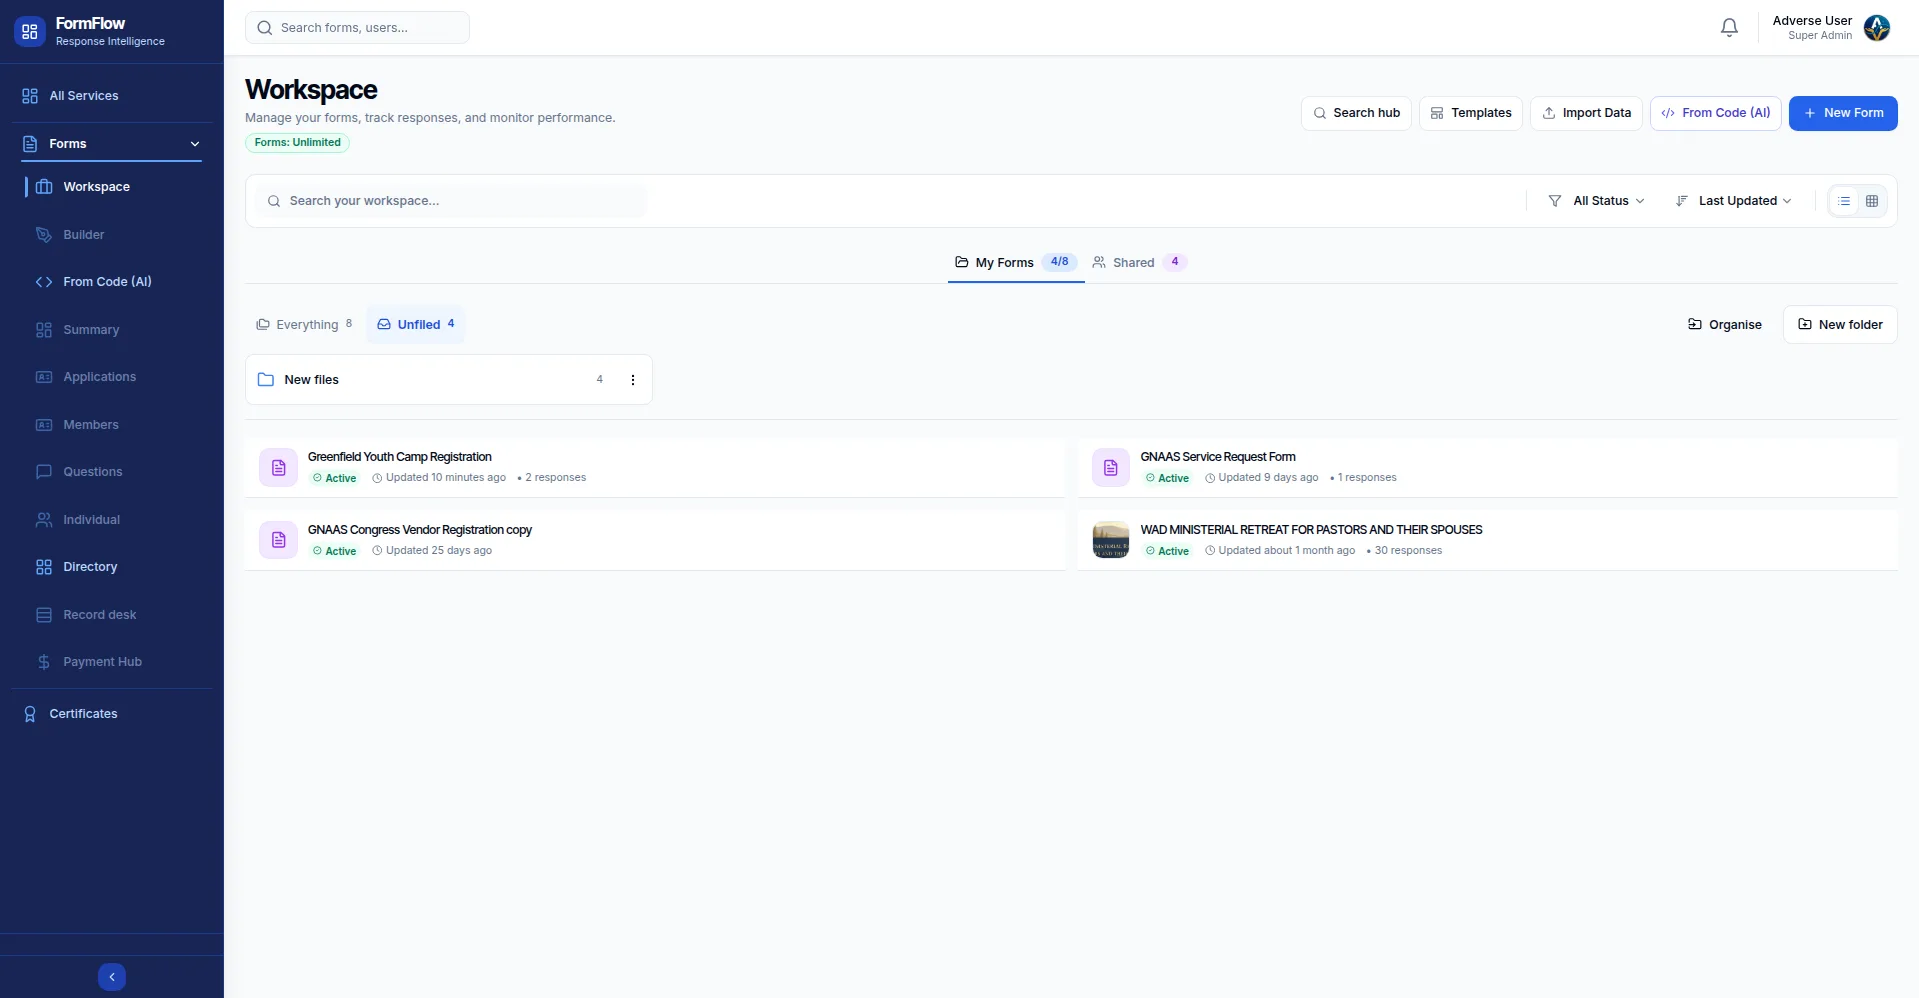
- Top buttons. Search hub, Templates, Import Data, From Code (AI) and + New Form.
- Find a form. Type in the search box, or filter by All Status and Last Updated. Switch between List and Gallery views.
- Tabs. My Forms shows your own forms; Shared shows forms others shared with you.
- Folders. Keep forms tidy with folders — Everything, Unfiled, New files, or make your own with New folder and Organise.
- Each form card shows the name, an Active badge, when it was last changed and how many answers it has (for example "Updated 2 days ago · 34 responses"). The Enabled switch turns the form on or off without deleting it.
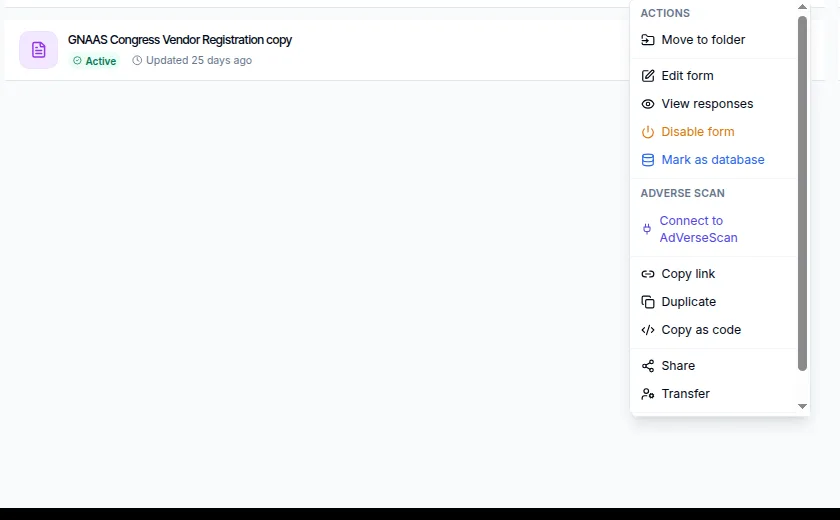
- The ⋮ menu. Every form card has a three-dot menu with everything you can do to that form: Move to folder, Edit form, View responses, Disable form, Mark as database, Connect to AdVerseScan, Copy link, Duplicate, Copy as code, Share, Transfer and Delete. More on these in Managing your forms.
2Starting a new form
Select + New Form and a blank form is created straight away — no pop-up, no questions to answer first. It opens in the builder, ready for your questions.
Starting from a template
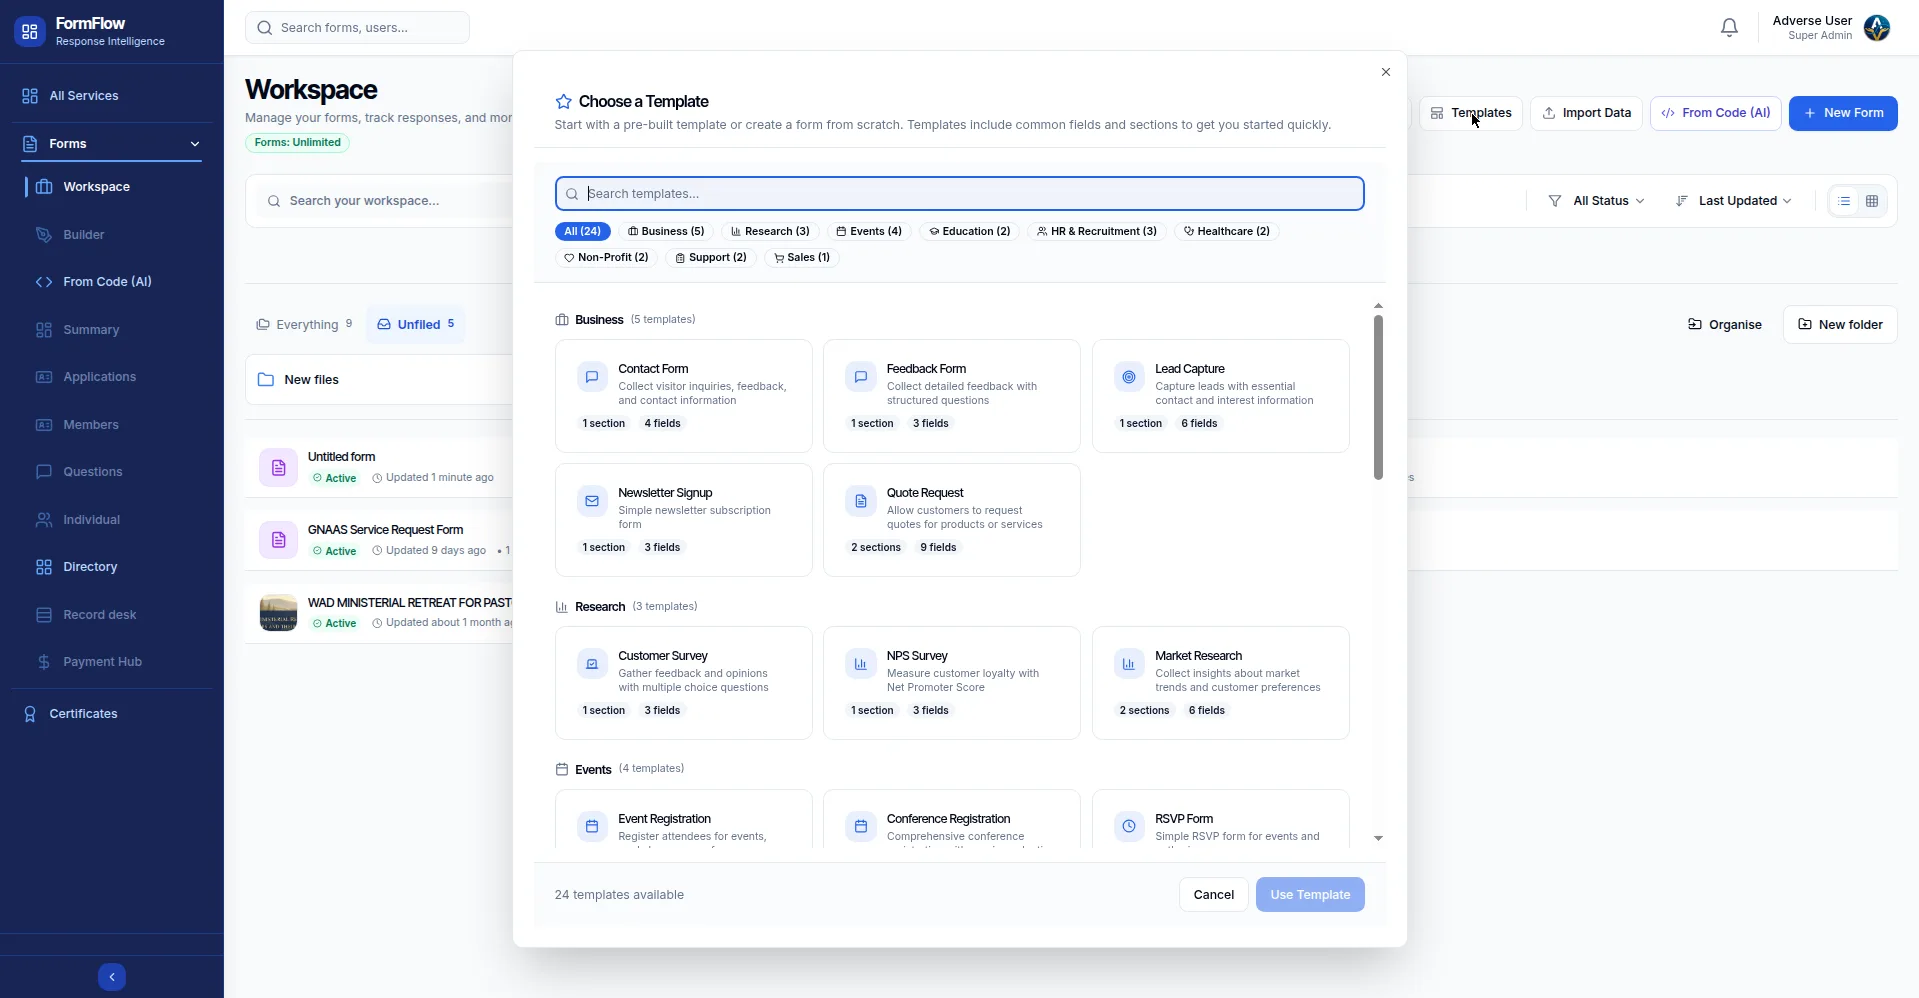
Select Templates on the home page to browse the gallery: 24 ready-made forms in categories like Business, Research, Events, Education, HR & Recruitment, Healthcare, Non-Profit, Support and Sales — for example Contact Form, Event Registration, Job Application and Donation Form. Pick the closest one, then change the questions to fit. Everything in a template can be edited or deleted.
3The form workspace
Open any form and you get four tabs across the top. This is where all the work happens.
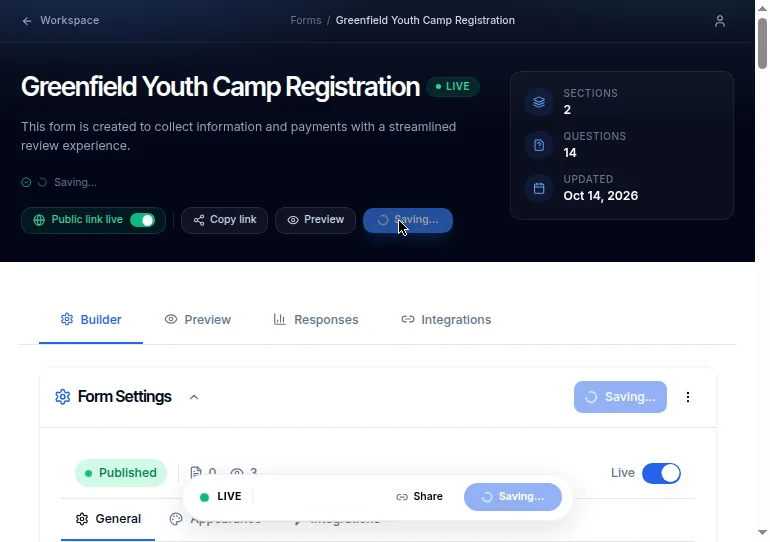
- Builder — add and arrange questions, change settings, make it look right.
- Preview — see the form exactly as respondents will see it.
- Responses — read the answers, see the numbers, download them.
- Integrations — send answers to other apps (more in Sending answers to other apps).
The top bar also shows a Public link live switch, Copy link, Preview and Save. Save often — your changes are kept only when you save.
4Adding questions
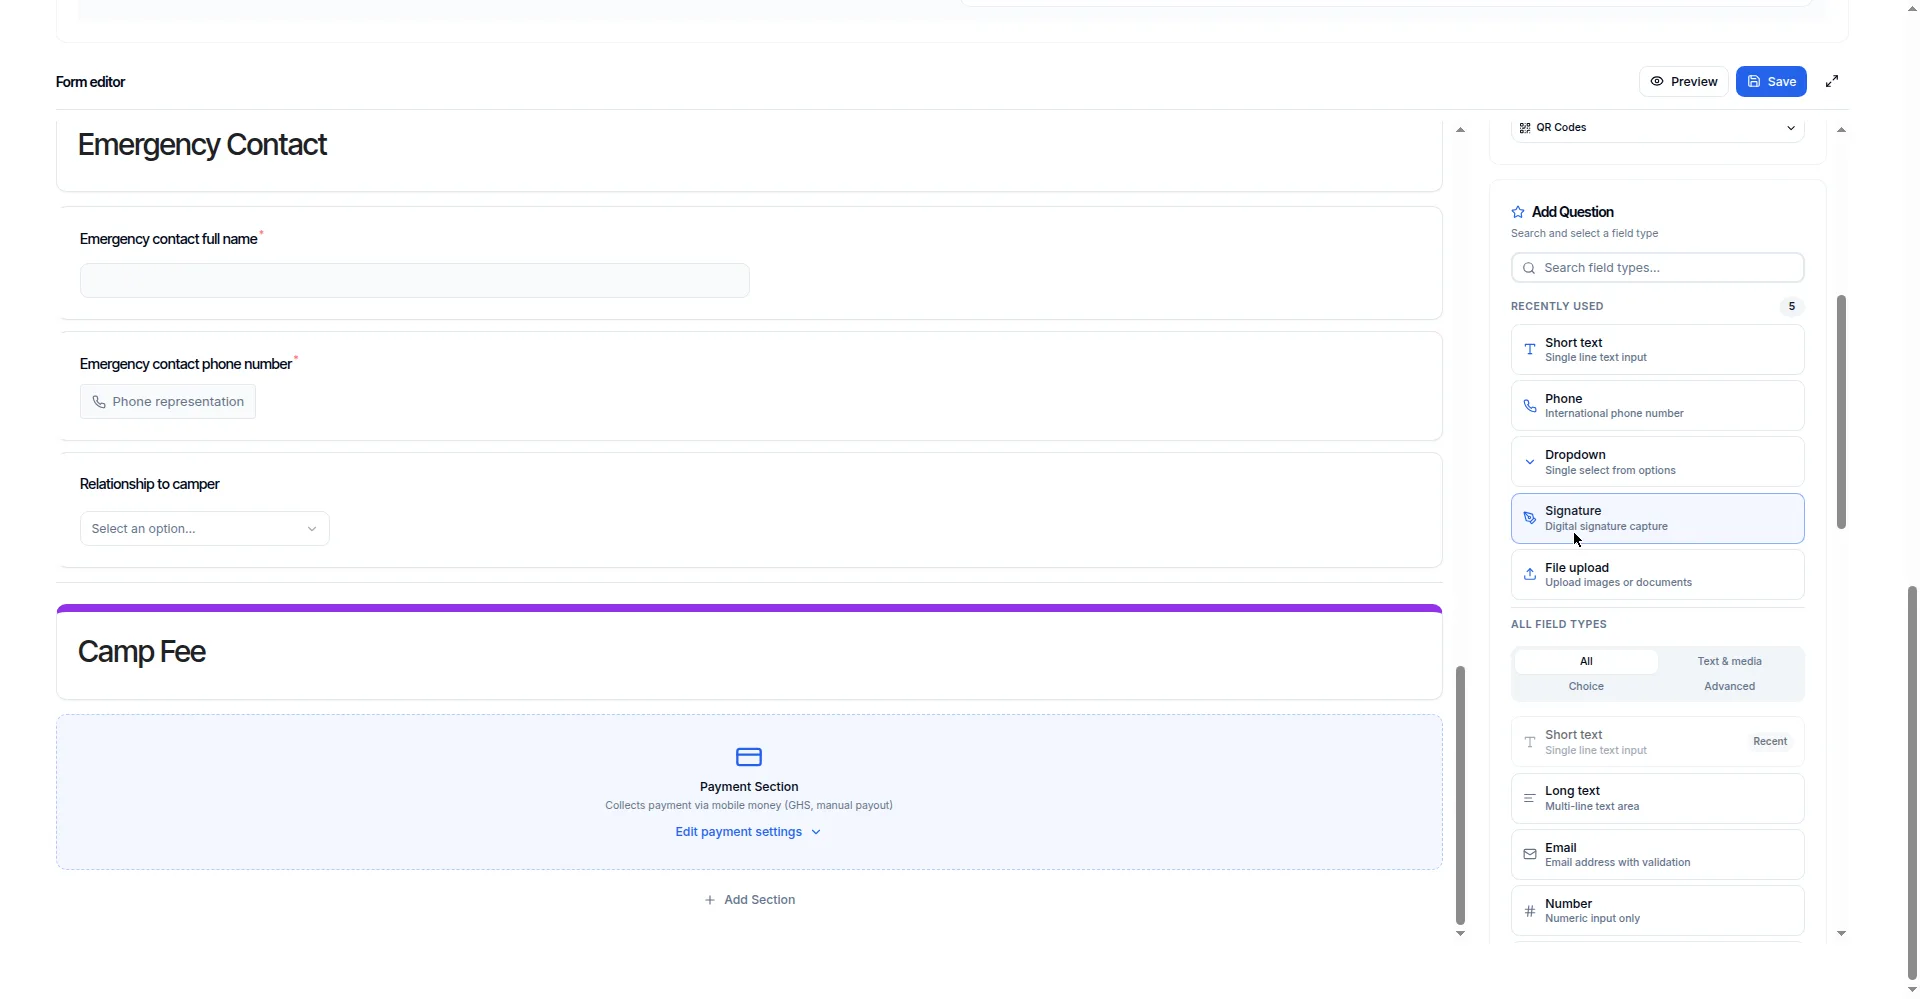
Questions come from the Add Question list in the builder. Click a type to add it, or drag it where you want it. Click any question on the form to select it; drag it up or down to move it.
The question types
There are 29 types, grouped so you can find things fast:
| Group | What you get |
|---|---|
| Text & contact | Short text (one line), Long text (a paragraph), Email, Number, Phone, Country, Address. |
| Choice | Dropdown (pick one from a list), Multiple choice (pick one), Checkboxes (pick as many as apply), Legal Checkbox (a tick box for terms). |
| Date | Date (a date picker with smart options — see Smart date questions), Date Range (a start and an end date). |
| Rating & scales | Rating (stars), Likert Scale (agree/disagree), Matrix (a table of questions answered the same way), Ranking (drag items into order), Slider (pick a number on a sliding bar). |
| Files & signature | File upload (photos or documents), Signature (sign with a finger or mouse). |
| Display | Image display (show a picture on the form), YouTube video (show a video), Description (write instructions or a heading on the form) — none of these ask anything. |
| Smart | Church unit and GNAAS unit (pick from the church or GNAAS directory), Calculated (a number worked out from other answers), Repeater (ask the same set of questions more than once), Hidden (a field people never see, for your own notes). |
These two only appear on Adventist accounts. They let people pick their union, zone or fellowship straight from the directory instead of typing it.
Change or remove a question
Click a question, then use the small buttons on it: the pencil edits it, the copy button duplicates it (the copy lands right below the original), the bin deletes it. Deleting a question also deletes its answers, so be careful on a form people have already filled in.
5Question settings
Click a question, then look at the settings panel. What you see depends on the question type.
Required questions
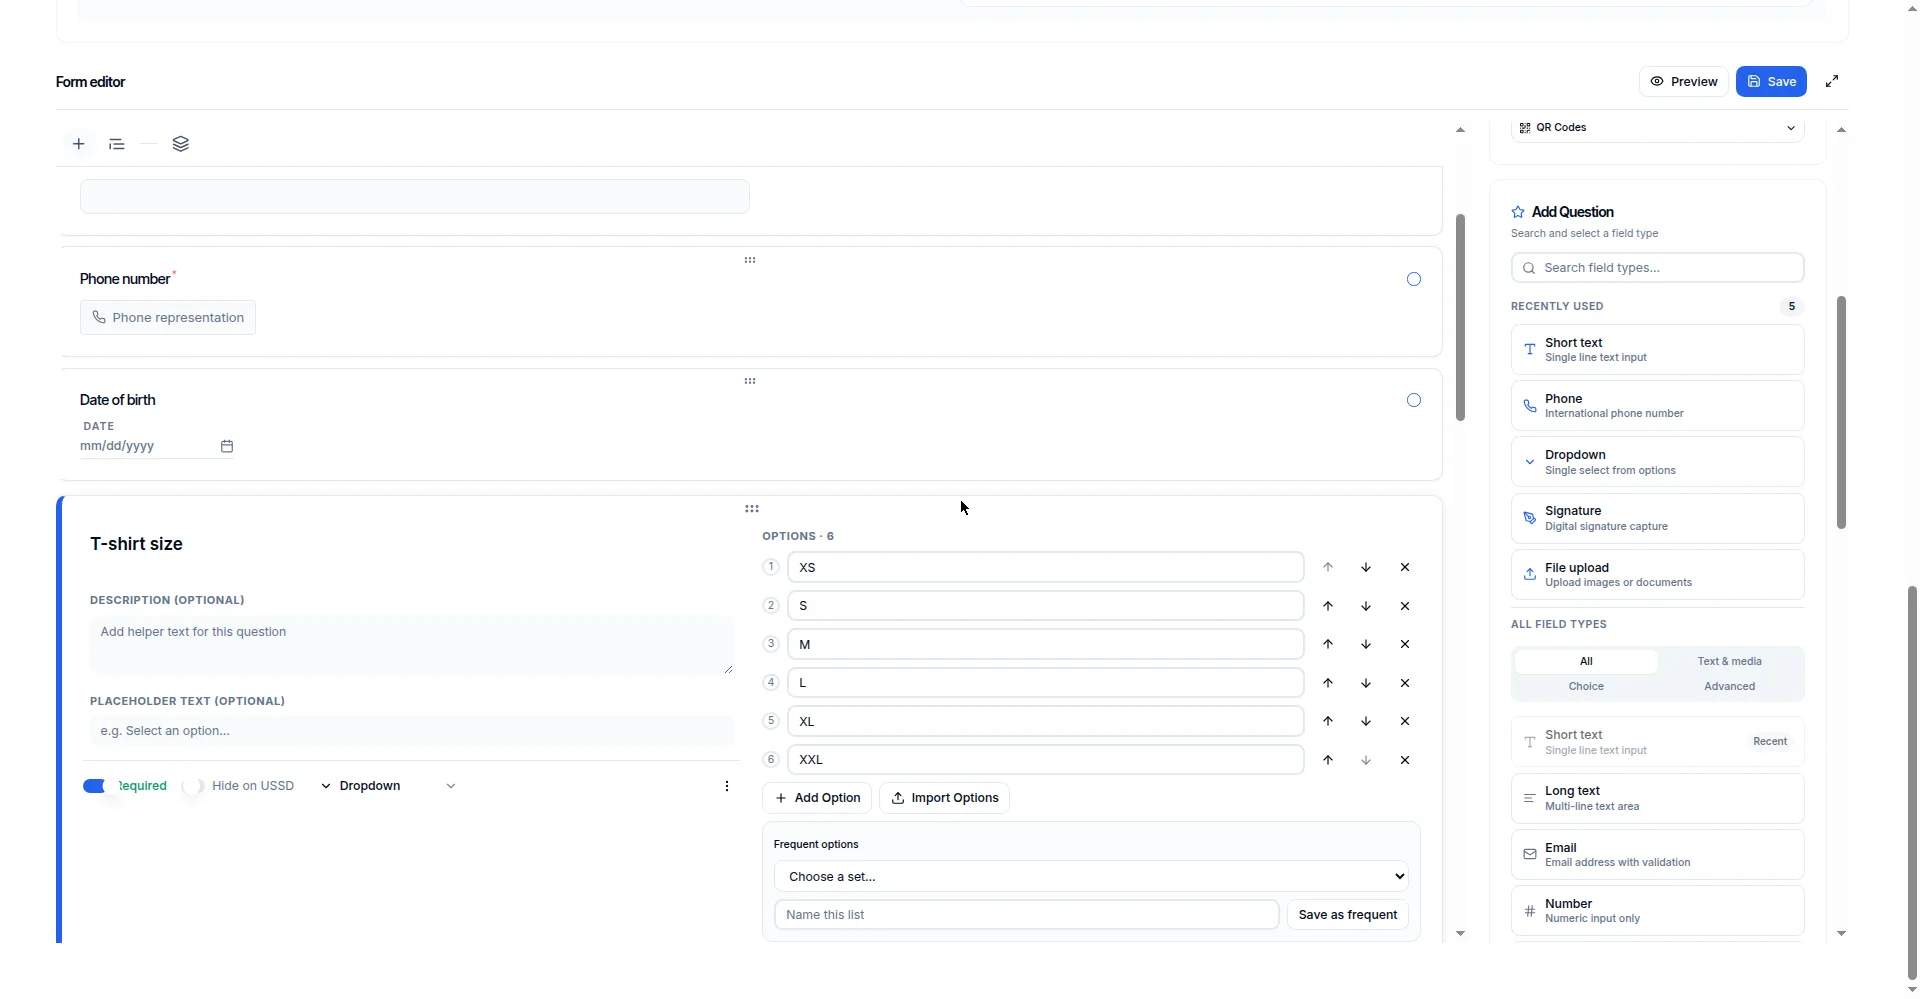
Turn on Required and the person must answer before they can submit. Use it for the questions you truly need — every required question is one more reason someone gives up halfway.
Answer options
For dropdowns, multiple choice and checkboxes, type each option on its own line in Options. You can reorder them by dragging, and add an Other option that lets people type their own answer.
Saved option sets
If you reuse the same options on many forms (for example a list of regions, or Yes / No / Maybe), save them once as a preset. Next time, pick the preset from the list instead of typing everything again. Change the preset and every question using it gets the new options.
Placeholder and description
- Placeholder: grey hint text inside an empty answer box, for example "e.g. Ama Serwaa". It disappears when the person starts typing.
- Description: a line of help under the question, for example "Use the name on your ID card."
6Smart date questions
Date questions are smarter than a plain calendar. Select the date question, open Date options, and choose what to ask.
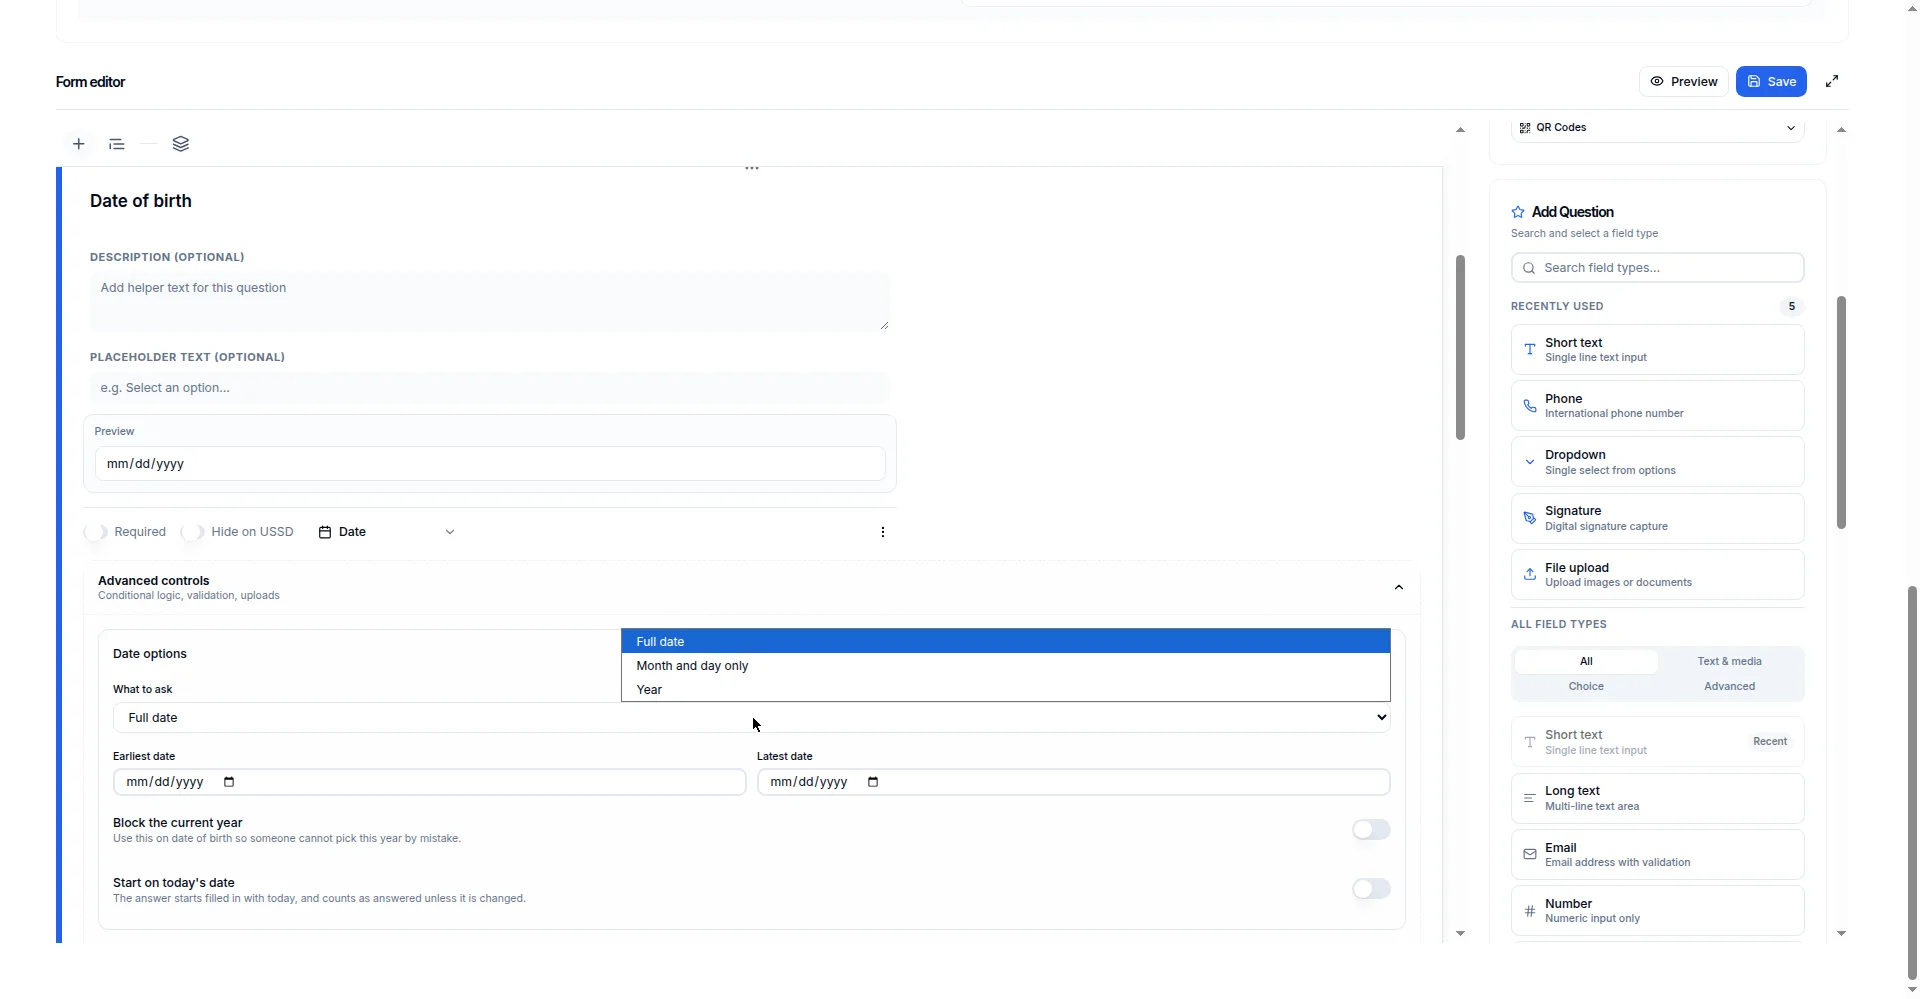
- Full date: day, month and year — the usual choice.
- Month and day only: for birthdays, when people do not want to share their birth year. The year box goes away — you still get the birthday for greetings, without the age.
- Year: for questions like "Year you joined" — people scroll through years instead of a full calendar.
- Earliest date and Latest date: nobody can pick outside this range. Useful for "date of birth" (no future dates) or camp dates.
- Block the current year: stops people picking this year — handy for birth years.
- Start on today's date: the box starts filled with today.
7Organising with sections
A section is a titled group of questions, for example "Personal details" or "Camp choices". Sections break a long form into readable chunks. Add one from the question list, then drag questions into it. The Form outline sidebar in the builder shows your sections at a glance and jumps to each one when you click it.
Turn on Pages and each section becomes its own page, with Back and Next buttons. One screen at a time feels light on a phone. People can go back and change earlier answers before they submit.
8Showing questions based on answers
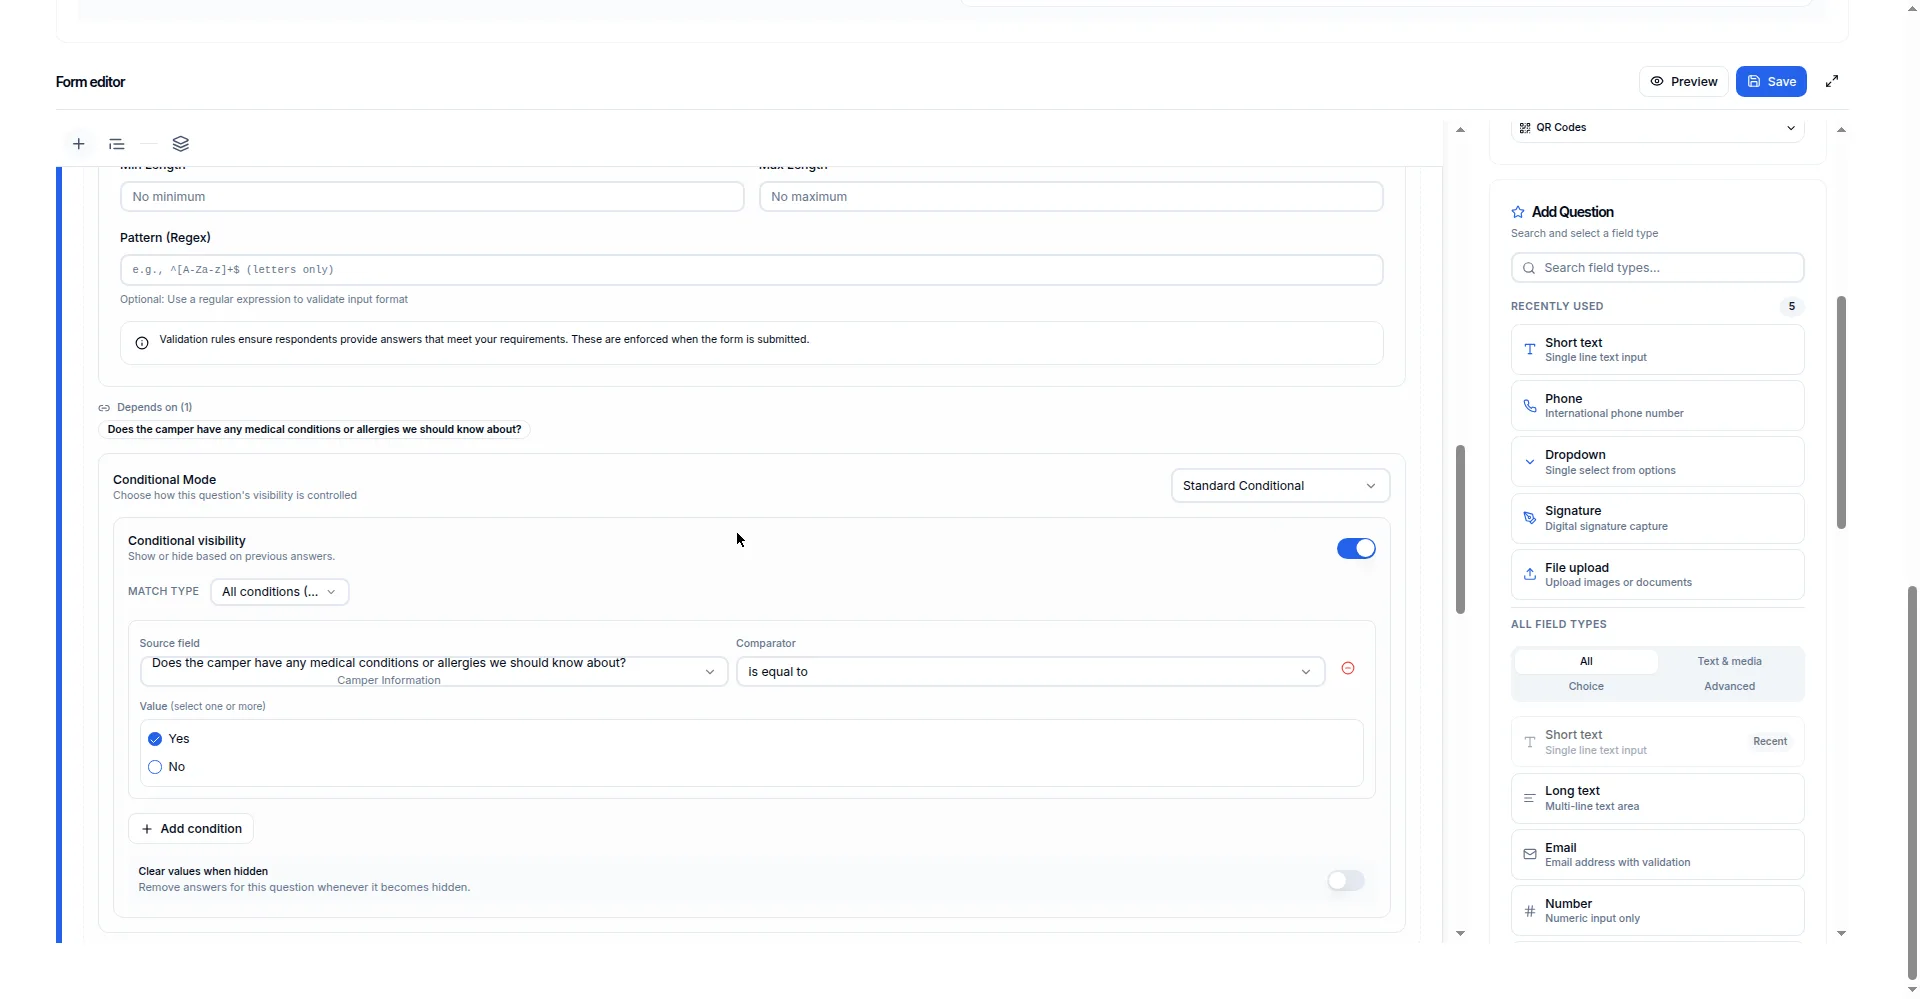
Show this question when…
On any question, open Show this question when and pick an earlier answer it depends on. For example: only show "Please give details" when the person answered "Yes" to "Does the camper have any medical conditions or allergies we should know about?". People never see questions that do not apply to them, so the form feels shorter.
Show/hide rules are powerful, but a form with too many of them is hard to test. After you add rules, fill in the form yourself once as each "type" of person and check the right questions appear.
9Previewing
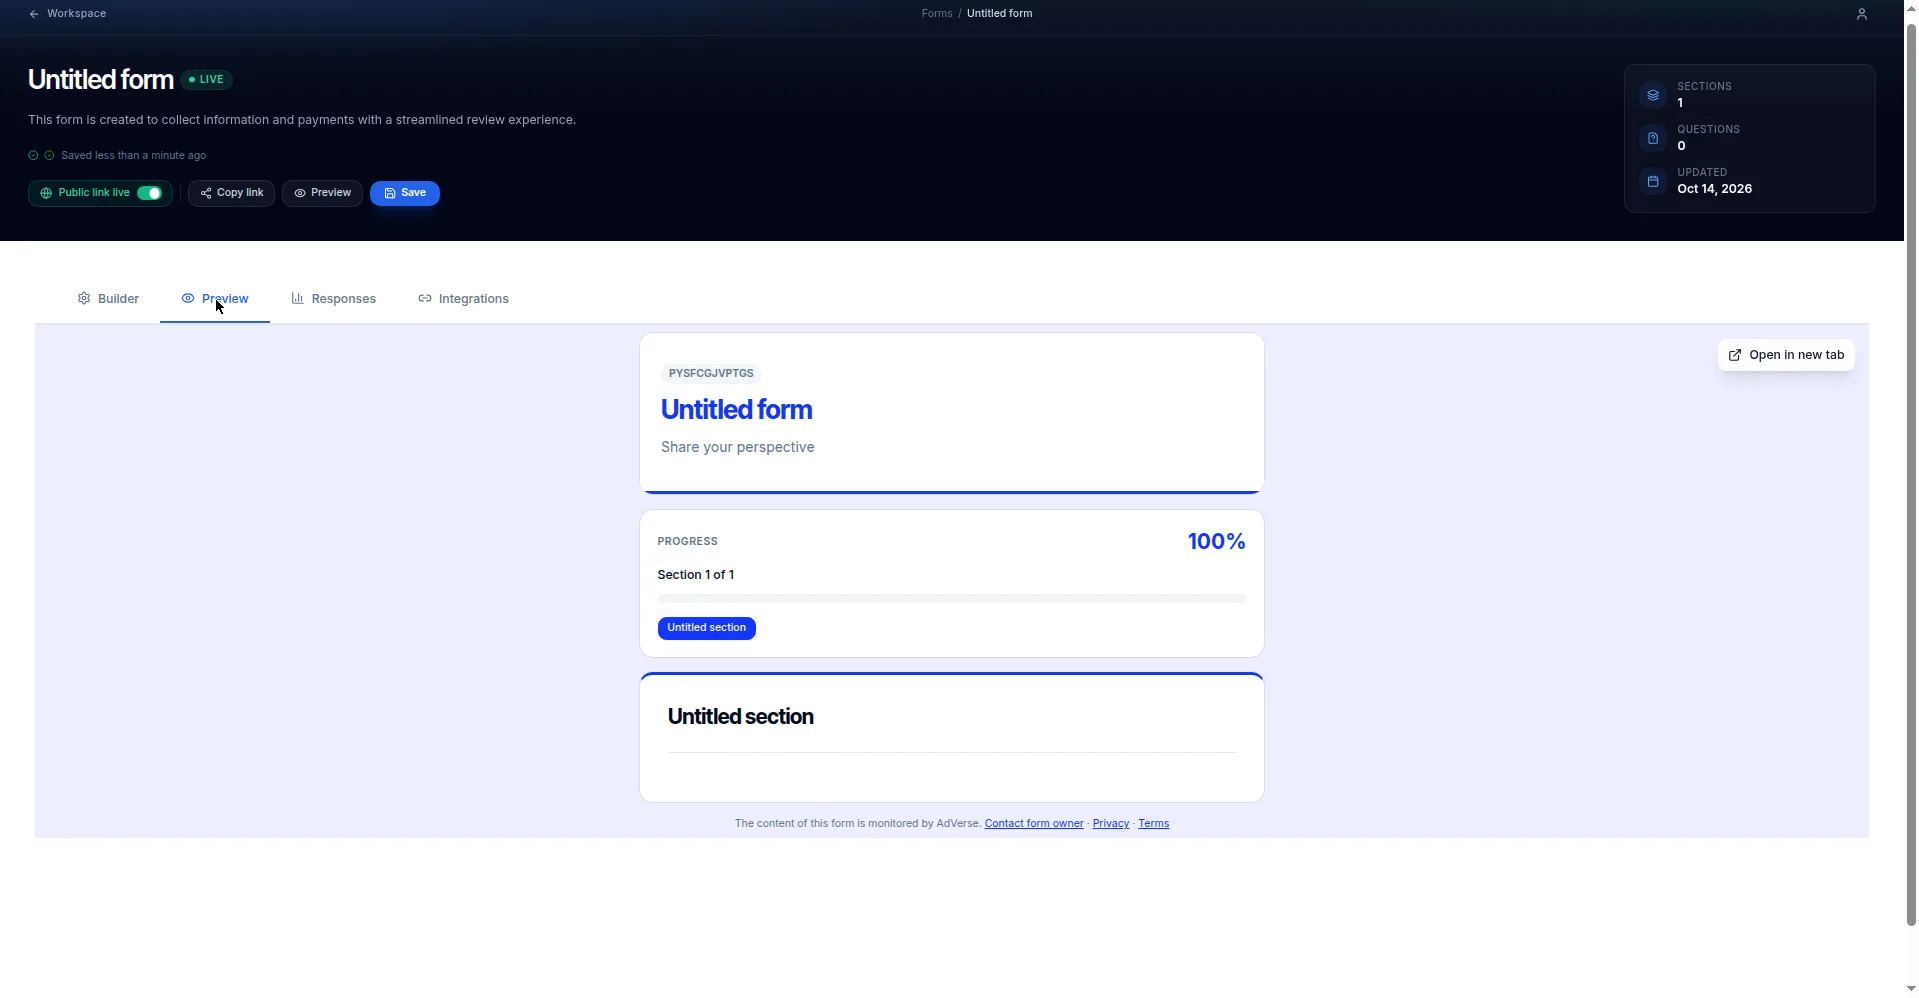
Open the Preview tab any time while you build. It shows the live form exactly as respondents will see it — the same questions, the same look, the same order. Use Open in new tab to see it full-screen, and try filling it in yourself before you share it.
10Making it look right
In the builder, open Form Settings and choose the Appearance tab. Pick one of 9 styles — Modern, Admission, Classic, Minimalist, Dark Mode, Neumorphic, Step-by-Step, Conversational or AI Chat — then make it yours:
- Theme color (or pick from the ready-made presets) and Typography for the text.
- Add a cover/banner image at the top and your logo.
- Set the page colors and a page background image behind the form.
Check the Preview tab after each change — what looks good on your laptop may feel crowded on a phone.
11Form settings
In the builder, Form Settings holds everything about how the form behaves. It has three tabs: General, Appearance and Integrations.
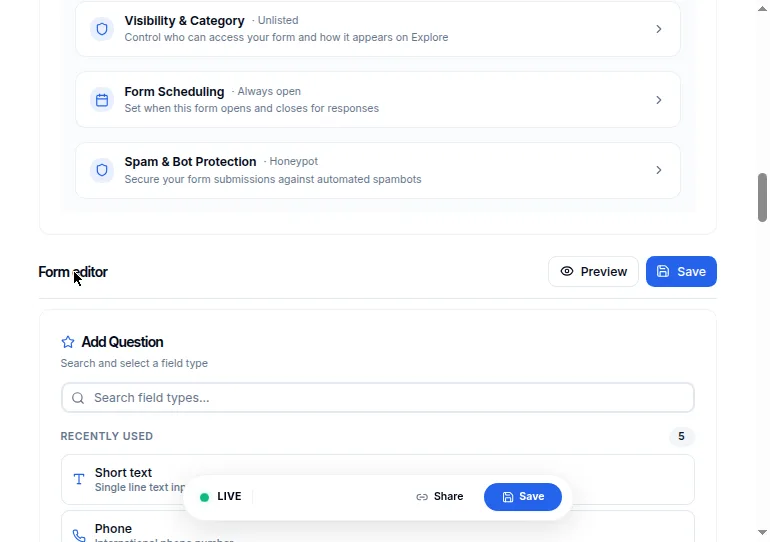
Form details
The title and description people see at the top of your form.
After submission
- Confirmation message: what people see right after they submit. Write something warm and useful, for example: "Thank you! We have your registration. Watch your WhatsApp for camp details."
- Redirect URL: send people to a web address instead of showing the message.
- Response limit: the form closes itself after this many answers. Handy when camp beds are limited.
- Progress bar: show people how far through the form they are.
- Registration code: give every respondent their own code, in random or sequential order — useful for check-in at the gate.
Visibility & category
Choose who can open the form: Public (anyone can find it), Unlisted (only people with the link), or Private (only people you allow). You can also file the form under a category.
Form scheduling
Set when the form opens and closes for answers, in your timezone. Turn on the countdown timer and respondents see how long is left — good for registration deadlines.
Spam & bot protection
Keep junk answers out. Honeypot quietly catches automated spam; the bot check asks real people to prove they are human before submitting.
The moment a form closes — by hand, by date, by answer limit, or with the Enabled switch — nobody new can submit. People halfway through will see "This form is closed" when they try to send.
12Extra tools
The Integrations tab inside Form Settings holds tools that connect your form to the rest of AdVerse:
- Donation Drive: add a donate button to the form, linked to one of your AdVerse Pay payment links.
- SMS Notifications: text yourself (or your team) when someone answers.
- Welcome Email: send each respondent an email after they submit.
- Respondent portal: let people view or update their own answers later through a secure link.
- Voucher gate: only people with a valid voucher code can open the form.
- AdverseSave Integration: automatically register respondents as savings members in AdVerse Save.
- Data Bundle/Airtime: sell data and airtime through the form, over USSD and Telegram.
- Student fees mapping: link form answers to student fee records.
- USSD Registration: let people register by dialling a code like *711*2203# on any phone — no internet needed.
13Sharing your form
A form only takes answers while it is switched on — use the Public link live switch in the builder, or the Enabled toggle on the home page.
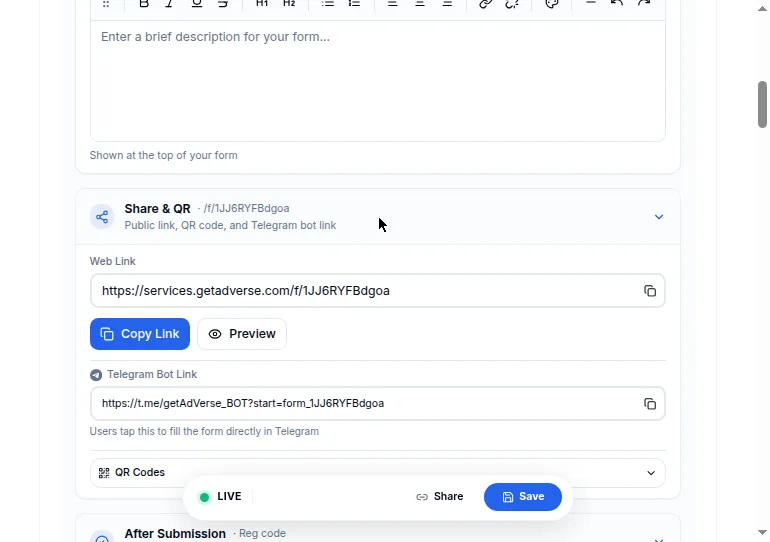
The public link
Every form has its own web address. Select Copy Link and send it by WhatsApp, SMS, email or social media. Anyone with the link can fill in the form — they do not need an AdVerse account.
Telegram bot link
The Telegram Bot Link opens the form inside Telegram, so people can fill it in without leaving the app.
QR codes
Select QR Codes to get a printable code. Stick it on a poster or a church notice board — people point their phone camera at it and the form opens.
Putting the form on your website
Open the Embed dialog and pick how the form sits on your site:
- iFrame — the option for most websites: copy the ready-made snippet and paste it where you want the form.
- JavaScript — for sites where you manage the code yourself.
- Link — just the plain web address.
- Popup — the form opens in a small window over your page.
You can set the width and height, pick a theme, hide the header or footer, and turn on auto resize so the form grows with its content. The Direct URL (for Google Sites & other platforms) is a plain link that works where snippets are not allowed.
14What the person filling sees
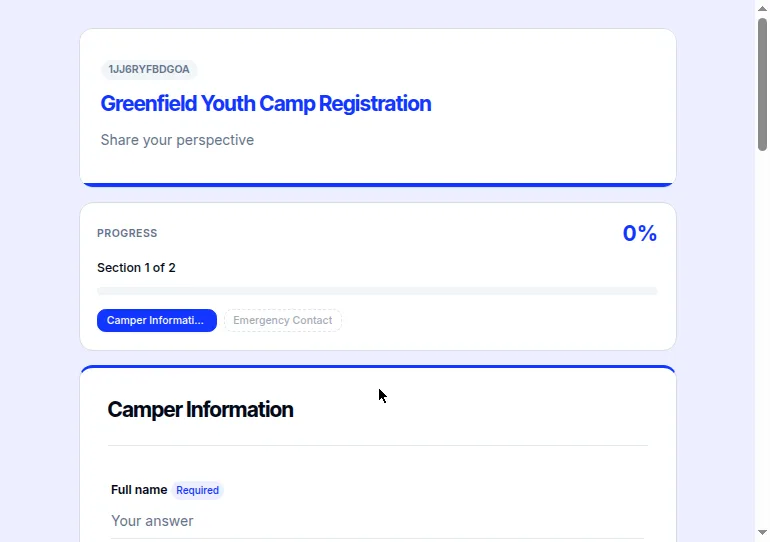
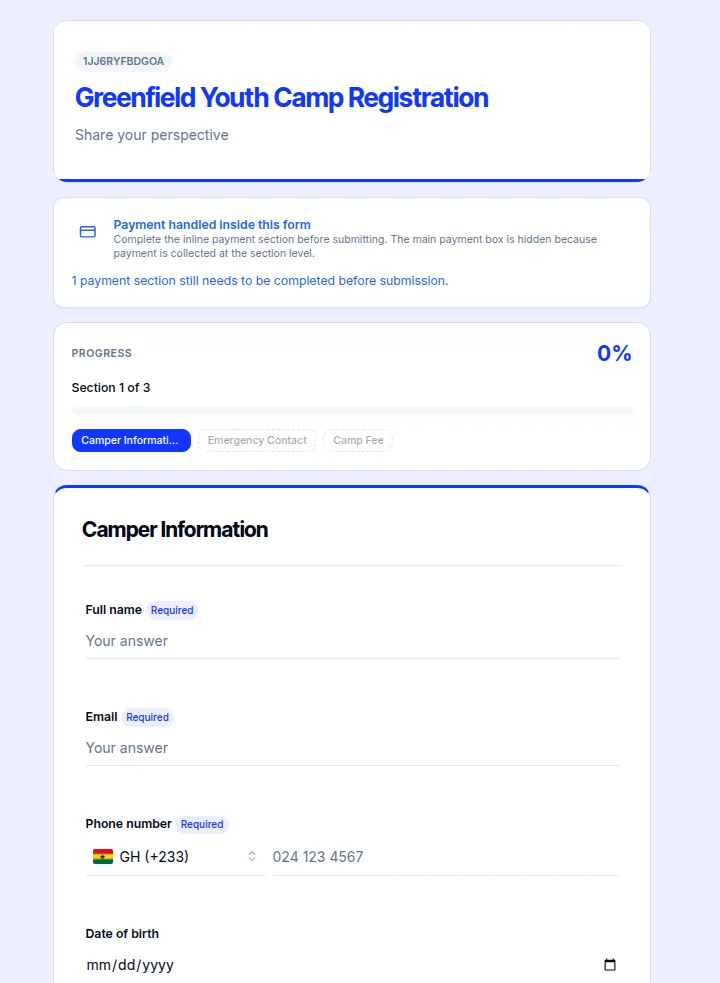
Respondents get a clean page with your title, description and questions — nothing of the builder, no AdVerse menus. It works in any browser, and they need no account.
15Collecting payments
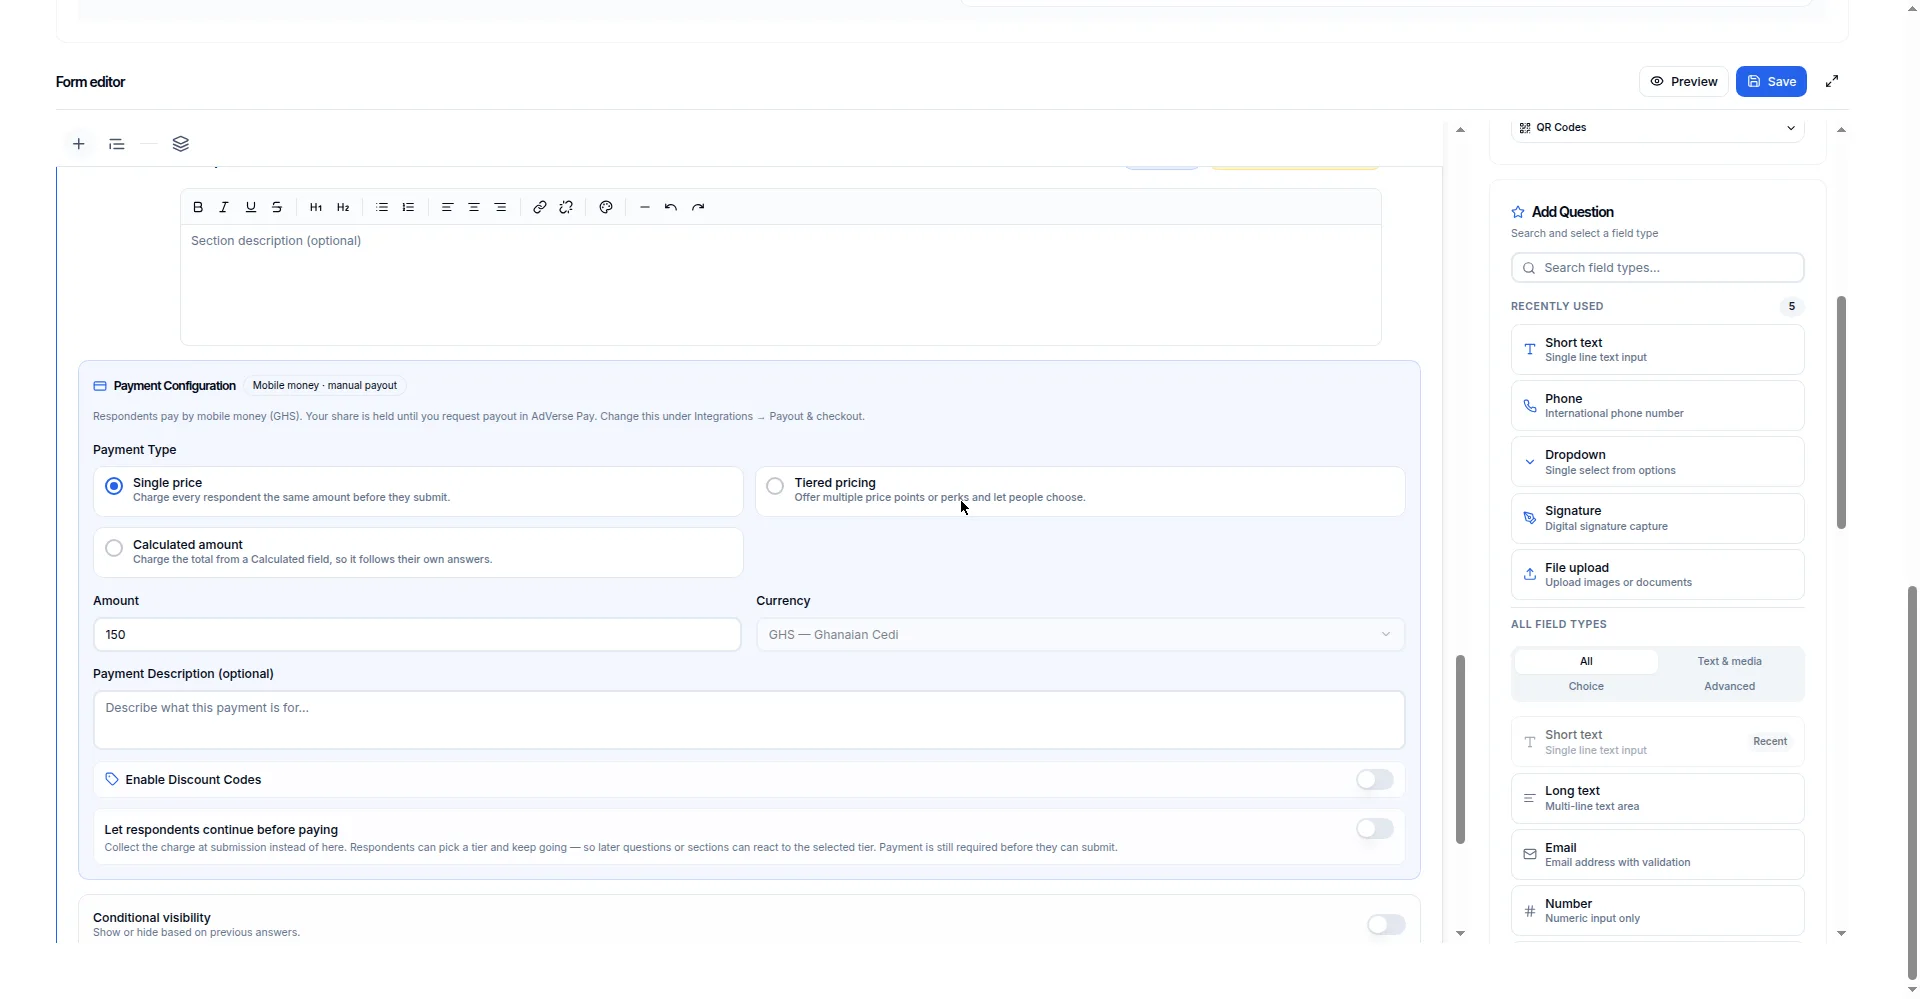
Add a payment question and set the amount — for example a camp fee of 150 GHS. When someone submits the form, they pay there and then: by mobile money or manual payout, collected as part of the submission. The answer is only counted once the payment goes through.
- Each payment shows in the response, so you can see who has paid and who has not.
- Money lands in the organisation's account; payouts work like the rest of AdVerse.
If a payment fails, the person is told to try again. Their answers are kept so they do not have to retype everything.
16Reading responses
Open the Responses tab — also called FormFlow — Response Intelligence — to see all answers in one place. Each row is one person's submitted form.
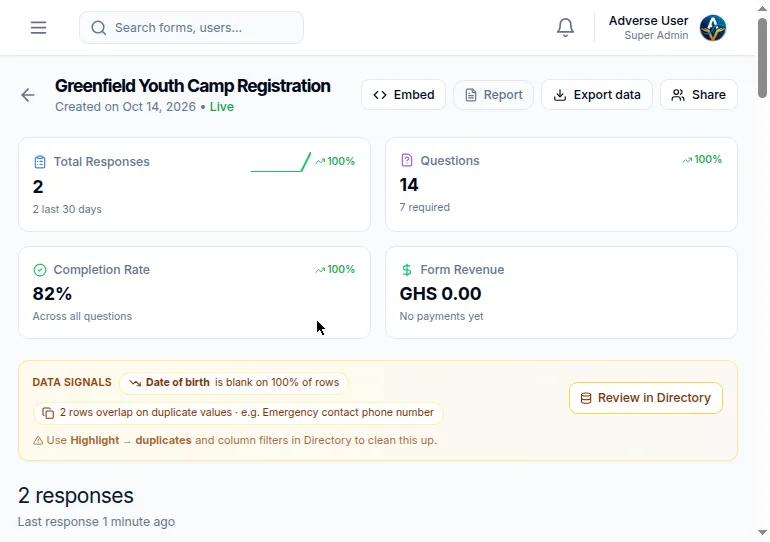
- Stat cards. Total Responses, Completion Rate and Form Revenue (from payment questions) at a glance.
- Member directory. One card per person, built from the name, phone and other details they gave. Search by name, open a card to see everything that person submitted, and edit or delete a member if you need to.
- Share menu. Copy dashboard, a public share link for the results, or invite by email so a teammate can view them.
- Responses report. Pick a date range to see how answers came in over time.
- Use Search to find a name or an answer, and the filters to narrow by date or by answer to a question. Embed puts the results view on your website.
17A single response
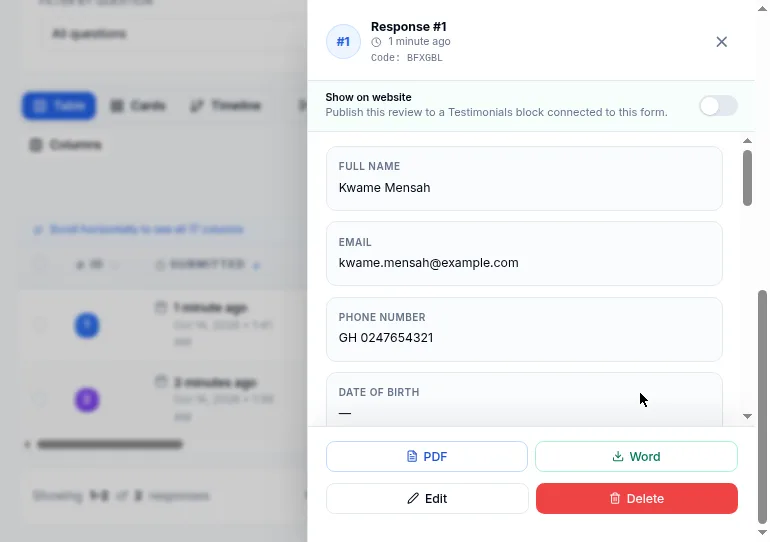
Click a row to open that person's full answers, in the order of your questions, with the date and time they submitted. If the form collects files or signatures, you open and download them here.
18Downloading the answers
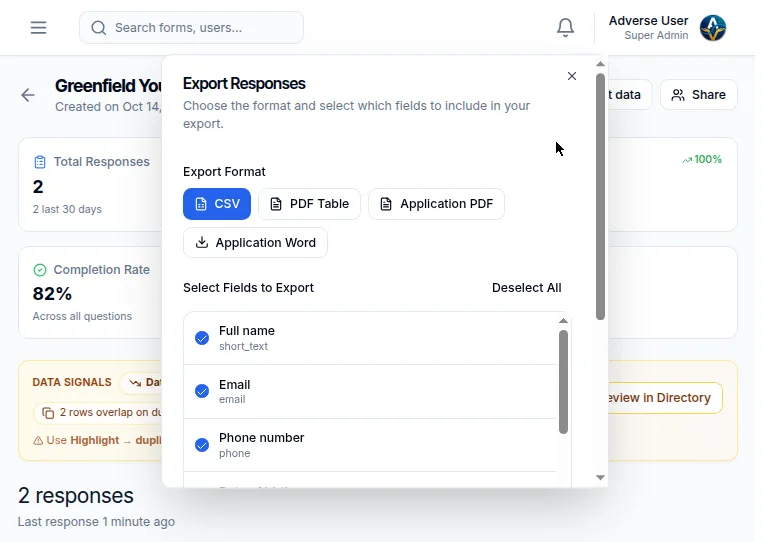
Select Export data to download all answers as a spreadsheet (CSV or Excel). Each question becomes a column, each person a row. Export again any time — it always includes the latest answers.
Export whenever you like and keep your own copies. Deleting a form deletes its answers too, so export first if you ever plan to remove a form.
19Sending answers to other apps
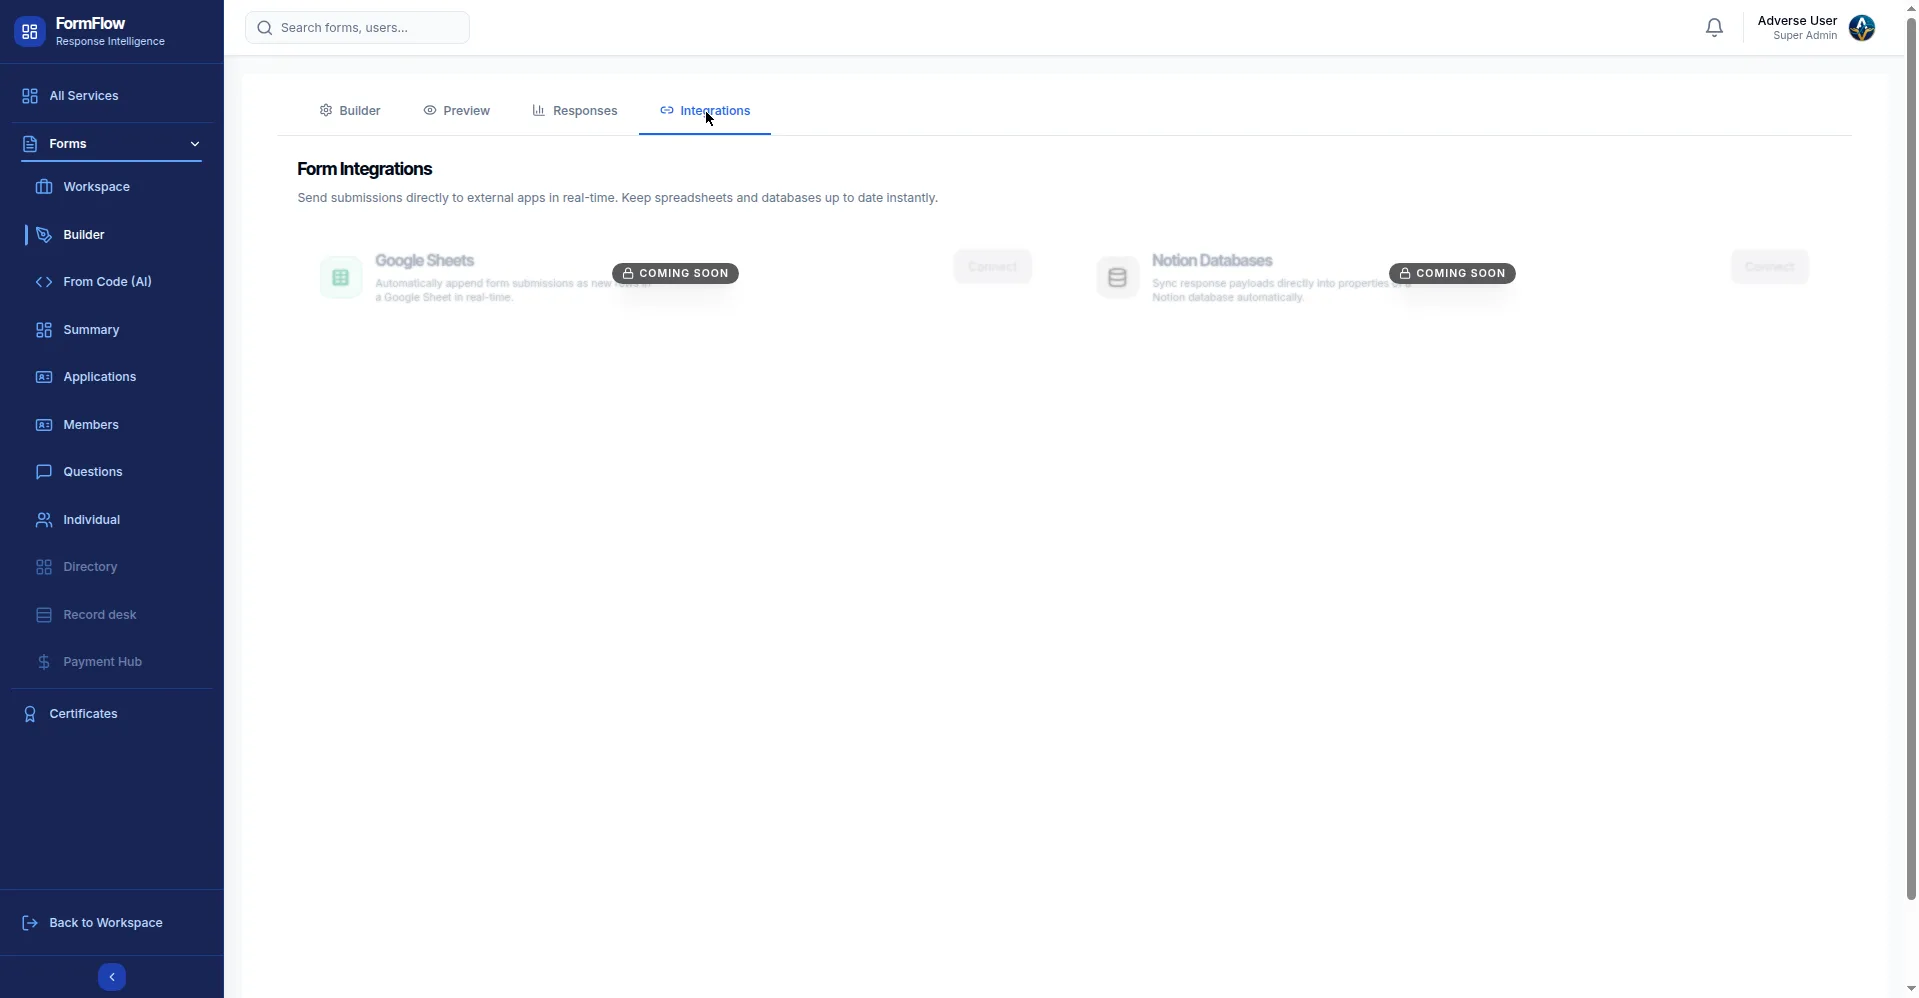
Open the Integrations tab to connect the form to other tools. Right now you will see Google Sheets and Notion Databases, both marked COMING SOON: when they are ready, every new answer will appear in your spreadsheet or Notion database by itself, with no copying and pasting.
20Managing your forms
Everything about a form's life happens from the ⋮ menu on its card (see Finding your way around):
- Duplicate: make a copy to reuse the same questions next term or next event. Move to folder keeps the list tidy.
- Disable form (or the Enabled switch): stop new answers without deleting anything. Turn it back on any time.
- Mark as database: treat the form's answers as a people list — this powers the member directory views.
- Connect to AdVerseScan: link the form to attendance scanning.
- Copy as code: get a code version of the form for the From Code (AI) flow.
- Transfer: hand the form to someone else. Delete: remove the form and all its answers for good — export first (see Downloading the answers).
Messages and fixes
The messages you are most likely to meet, and what to do.
| You see | Why, and what to do |
|---|---|
| "This form is closed." | The close date passed, the answer limit was reached, or the owner switched it off. Ask the form owner to reopen it (see Sharing your form). |
| "You have already responded." | One answer per person is on. If it was a mistake, the form owner can delete your old answer so you can try again. |
| "Please answer the required questions." | Questions marked Required are empty. Fill them in — they are marked with a star. |
| "The file is too large." | The upload is bigger than the form allows. Use a smaller photo or file and try again. |
| "Payment failed. Please try again." | The payment did not go through. Check the mobile money balance, then retry — the typed answers are kept. |
| "Form not found." | The link is wrong or the form was deleted. Check the link with whoever sent it. |
| "You do not have permission to view responses." | Your role cannot read answers. Ask the form owner. |
| A question you expected does not appear | It may only show for certain answers (see Show this question when…). Fill in the form as the person would and check. |
Glossary
- Workspace
- The Forms home page with all your forms.
- Form
- The whole thing: your questions, shared with one link.
- Question
- One thing you ask, for example "Full name".
- Response
- One person's filled-in form.
- Section
- A titled group of questions inside the form.
- Page
- One screen of a multi-page form.
- Template
- A ready-made form you can start from.
- Required
- A question that must be answered before submitting.
- Options
- The preset answers for a choice question.
- Preset
- A saved set of options you can reuse on many questions.
- Public link
- The web address anyone can use to fill in the form.
- QR code
- A printable square code; a phone camera turns it into the form link.
- Confirmation message
- What people see right after they submit.
- Response limit
- The maximum number of answers before the form closes itself.
- Registration code
- A unique code given to each respondent, for check-in.
- Member directory
- The searchable people list built from the answers.
- Payment question
- A question that collects money when the form is submitted.
- Voucher gate
- Requiring a voucher code before the form will open.
- USSD
- Registering by dialling a code on any phone, no internet needed.